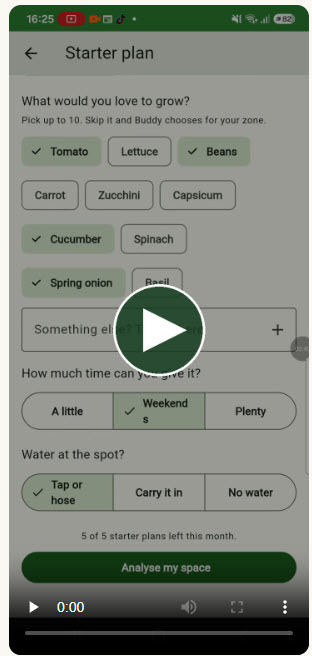
Tap to watch the starter plan demo (2:53).
Twelve square metres of lawn. One photo. Five questions. About three minutes later there is a week-by-week plan, a shopping list priced at today’s supermarket prices, and a bed sitting in the garden planner ready to lay out. That is the starter plan, and the video above is the whole thing, unedited.
What you actually do
You point your camera at the spot. Lawn, balcony, courtyard, the strip beside the shed, whatever you have got. Then five quick questions:
- Which side of the photo faces north
- What kind of space it is
- What you would love to grow (this one picked tomatoes, beans, cucumbers and spring onion)
- How much time you want to put in
- Where the water comes from, tap or watering can
There is a climate zone question too, already filled in from your account. No GPS, no location tracking. You tell GardenBuddy.au where you garden, and the plan is built for that zone, whether that is Cairns, Hobart or anywhere between.
GardenBuddy.au shows its homework
This is the part most tools skip. GardenBuddy.au does not go straight from photo to plan. It first tells you what it saw and asks you to check it. In the video: a grass yard of roughly 12 square metres, uneven surface, visible mowing paths, low winter light, no structures in the way. Each one sits there for you to confirm or correct.
And if there is something the photo cannot show, you type it in. “Lots of rocks under the surface.” “This used to be where the car parked, the soil is rock hard.” GardenBuddy.au folds that into the plan. A photo tells you plenty about a space, but the person standing in it knows more, so the plan uses both.
What comes out
A staged plan, not a lecture. Week one: mark out the bed on the sunny edge, strip the sod, check the drainage. Week two: soil enrichment, compost and manure worked in. Then planting windows matched to your zone and the calendar, with the crops you asked for slotted where they fit. This patch came out at an estimated 20 to 30 kg of fresh produce over the season, on low effort and hand watering.
The shopping list is costed from the same live price data that runs our veg price tracker, so the compost, seedlings and stakes carry real numbers, and you can see what the harvest is worth against what you spent.
Then it lands in the planner
One tap adds the bed to the garden planner, so you can drag the layout around, see the price tag on each crop, and keep working the plan instead of filing it away as a nice PDF you never open again.
Already have a garden?
The starter plan is not just for the first patch. If you are a member with beds on the go, the Home screen shows “Plan another veggie patch”. Photograph the new corner, the balcony, the bit of lawn you have been eyeing off, and GardenBuddy.au plans that one too. Starter members get two plans a month, Pro members five.
Your first plan is free
Every free account gets one starter plan, no card, no catch. Photograph your patch, answer the questions, and see what GardenBuddy.au makes of it. If it earns its keep, the paid plans start at $29 a year.
This is the first post in our Features series, where we walk through one part of GardenBuddy.au at a time, screen recording and all, warts included. Next time you see a patch of grass and think “that could be dinner”, you know where to start.